GIFT - 云代码空间
——
代码的日语注释部分请忽视。后面有讲解
public class PhotoGallery extends Activity {
	public final static int SMALL_IMAGE = 0;
	public final static int ORIGINAL_IMAGE = 1;
	public final static int SHOW_PHOTO = 0;
	private ImageAdapter mAdapter = null;
	private ImageView mPreview = null;
	private long mPreviewId = 0;

	public void onCreate(Bundle savedInstanceState) {
		super.onCreate(savedInstanceState);
		setContentView(R.layout.gallery);
		Gallery gallery = (Gallery)findViewById(R.id.gallery1);
		mPreview = (ImageView)findViewById(R.id.preview);
		// 「ImageAdapter」という新しいクラスのインスタンスを作成する
		mAdapter = new ImageAdapter(this);
		// 「ImageAdapter」をgalleryに設定する
		gallery.setAdapter(mAdapter);
		// 「OnItemClickListener」のインスタンスを作成して「gallery」に設定する
		gallery.setOnItemClickListener(new OnItemClickListener(){
			public void onItemClick(AdapterView<?> parent, View v,
					int position, long id){
				mPreview.setImageBitmap(mAdapter.getImageBitmap(position,
						ORIGINAL_IMAGE));
				mPreviewId = mAdapter.getItemId(position);
			}
		});
		// 「OnClickListener」のインスタンスを作成し「mPreview」に設定する
		mPreview.setOnClickListener(new OnClickListener(){
			public void onClick(View v){
				Intent intent = new Intent(PhotoGallery.this,
						PhotoViewerActivity.class);
				intent.putExtra("id",mPreviewId);
				startActivityForResult(intent,SHOW_PHOTO);
			}
		});
	}


	public class ImageAdapter extends BaseAdapter {
		ContentResolver mResolver = null;
		private int mGalleryItemBackground = 0;
		private ArrayList<Long> mImageIds = new ArrayList<Long>();
		private ArrayList<String> mImageNames = new ArrayList<String>();
		public ImageAdapter(Context c){
			// ContentResolverを取得
			mResolver = c.getContentResolver();
			// イメージ画像用のURIを使用して画像データのリストを入手
			Cursor cursor = mResolver.query(
					MediaStore.Images.Media.EXTERNAL_CONTENT_URI,
					null,null,null,null);
			// whileループでqueryの結果のデータを順番に処理
			while(cursor.moveToNext()){
				// 画像データの名前を取り出す
				String name = cursor.getString(
						cursor.getColumnIndex(
								MediaStore.Images.Media.TITLE));
				// ファイルのIDを取得
				long id=cursor.getLong(
						cursor.getColumnIndex(
								MediaStore.Images.Media._ID));
				// ArrayListに値を追加
				mImageIds.add(id);
				mImageNames .add(name);
			}
			cursor.close();
		}
		// 「getCount」メソッドの定義
		public int getCount(){
			return mImageIds.size();
		}
		// 「getItem」メソッドの定義
		public Object getItem(int position){
			return mImageNames.get(position);
		}
		// 「getItemId」メソッドの定義
		public long getItemId(int position){
			return mImageIds.get(position);
		}
		// 「getView」メソッドの定義
		public View getView(int position,View convertView, ViewGroup parent){
			if(convertView == null){
				convertView = new ImageView(PhotoGallery.this);
				// 「getImageBitmap」メソッドでGallery用のBitmapを取得しImageViewにセット
				((ImageView)convertView).setImageBitmap(getImageBitmap(position, SMALL_IMAGE));
				// 「Gallery.LayoutParams」を作成し、Viewのサイズを150 x 100にセット
				convertView.setLayoutParams(new Gallery.LayoutParams(200,200));
				// 「ScaleType」で「FIT_XY」を指定し、画像をViewのサイズに合わせる
				((ImageView)convertView).setScaleType(ImageView.ScaleType.FIT_XY);
				// 「BackGroundResource」メソッドを「GalleryItemBackgournd」のリソースに設定
				convertView.setBackgroundResource(mGalleryItemBackground);
			}
			return convertView;
		}
		private Bitmap getImageBitmap(int position,int size){
			// 「Uri.withAppendedPath」を使用して画像のURIとIdから
			// 直接ファイルを表すURIを作成
			Uri imageUri = Uri.withAppendedPath(
					MediaStore.Images.Media.EXTERNAL_CONTENT_URI, ""+getItemId(position));
			// BitmapFactoryでsamplingを設定するために
			//「BitmapFactory.Options」のオブジェクトを作成
			BitmapFactory.Options options = new BitmapFactory.Options();
			if(size == SMALL_IMAGE){
				// Gallery用の縮小イメージは「inSampleSize」に「10」を指定
				options.inSampleSize = 10;
			}else{
				// それ以外は「inSampleSize」を「4」に設定
				options.inSampleSize = 4;
			}
			Bitmap resizedBitmap = null;
			try{
				// 「contentResolver」にUriを指定してInputStreamを開く
				InputStream is = mResolver.openInputStream(imageUri);
				// ファイルから画像を取り出して「resizedBitmap」オブジェクトを作成
				resizedBitmap = BitmapFactory.decodeStream(is,null,options);
				is.close();
			}catch(IOException e){
				return null;
			}
			return resizedBitmap;
		}
	}
}

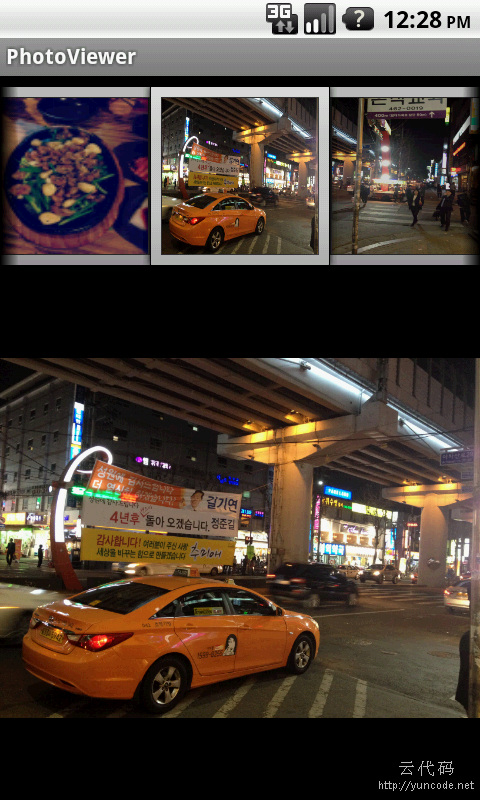
gallery.setAdapter(mAdapter);在Gallery中显示小图像,需要用到Gallery#setAdapter。
 gallery.setOnItemClickListener(new OnItemClickListener(){
 public void onItemClick(AdapterView<?> parent, View v,
 int position, long id){
 mPreview.setImageBitmap(mAdapter.getImageBitmap(position,
 ORIGINAL_IMAGE));
 mPreviewId = mAdapter.getItemId(position);
 }
 });
点击缩略图的监听器。点击后,用ImageView#setImageBitmap方法显示大图。并设置选中图片的ID。mPreview.setOnClickListener(new OnClickListener(){
public void onClick(View v){
Intent intent = new Intent(PhotoGallery.this,
PhotoViewerActivity.class);
intent.putExtra("id",mPreviewId);
startActivityForResult(intent,SHOW_PHOTO);
}
});
}
ImageView的监听器。点击进行画面迁移,并设置ID。 public class ImageAdapter extends BaseAdapter {
ContentResolver mResolver = null;
private int mGalleryItemBackground = 0;
private ArrayList<Long> mImageIds = new ArrayList<Long>();
private ArrayList<String> mImageNames = new ArrayList<String>();
public ImageAdapter(Context c){
mResolver = c.getContentResolver();
Cursor cursor = mResolver.query(
MediaStore.Images.Media.EXTERNAL_CONTENT_URI,
null,null,null,null);
while(cursor.moveToNext()){
// 取出图像名
String name = cursor.getString(
cursor.getColumnIndex(
MediaStore.Images.Media.TITLE));
// 取出图像ID
long id=cursor.getLong(
cursor.getColumnIndex(
MediaStore.Images.Media._ID));
mImageIds.add(id);
mImageNames .add(name);
}
cursor.close();
}
// 返回图像数量
public int getCount(){
return mImageIds.size();
}
// 返回图像名
public Object getItem(int position){
return mImageNames.get(position);
}
// 返回图像ID
public long getItemId(int position){
return mImageIds.get(position);
}
// 获取SD卡中的图像
public View getView(int position,View convertView, ViewGroup parent){
if(convertView == null){
convertView = new ImageView(PhotoGallery.this);
((ImageView)convertView).setImageBitmap(getImageBitmap(position, SMALL_IMAGE));
// 设置小图像的大小
convertView.setLayoutParams(new Gallery.LayoutParams(200,200));
// 使图像的大小跟控件相符
((ImageView)convertView).setScaleType(ImageView.ScaleType.FIT_XY);
// 「BackGroundResource」メソッドを「GalleryItemBackgournd」のリソースに設定
convertView.setBackgroundResource(mGalleryItemBackground);
}
return convertView;
}
private Bitmap getImageBitmap(int position,int size){
Uri imageUri = Uri.withAppendedPath(
MediaStore.Images.Media.EXTERNAL_CONTENT_URI, ""+getItemId(position));
BitmapFactory.Options options = new BitmapFactory.Options();
if(size == SMALL_IMAGE){
options.inSampleSize = 10;
}else{
options.inSampleSize = 4;
}
Bitmap resizedBitmap = null;
try{
InputStream is = mResolver.openInputStream(imageUri);
resizedBitmap = BitmapFactory.decodeStream(is,null,options);
is.close();
}catch(IOException e){
return null;
}
return resizedBitmap;
}
}
}
重要的来了。生成ImageAdapter,继承BaseAdapter。这个类的作用就是把SD卡的图像,图像名,图像ID等等的信都交给GALLERY。mResolver = c.getContentResolver(); // イメージ画像用のURIを使用して画像データのリストを入手 Cursor cursor = mResolver.query( MediaStore.Images.Media.EXTERNAL_CONTENT_URI, null,null,null,null);ContentResolver类的作用是向ContentProvider发送请求,通过query方法返回Cursor。ContentProvide又是什么呢?它是管理安卓内部的各种资源,比如内置存储空间里的图片,音乐,动画,或者SD中的数据。应该是类似数据库。
MediaStore.Images.Media.EXTERNAL_CONTENT_URIquery方法的参数是指定查找对象的URI。EXERNAL_CONTENT_URI,外部存储,也就是SD的URI。
			while(cursor.moveToNext()){

				String name = cursor.getString(
						cursor.getColumnIndex(
								MediaStore.Images.Media.TITLE));
				long id=cursor.getLong(
						cursor.getColumnIndex(
								MediaStore.Images.Media._ID));
				mImageIds.add(id);
				mImageNames .add(name);
			}
			cursor.close();
		}
Cursor的用法跟访问数据库的方法很像,通过MoveToNext方法取得下一个,getString取得图像名,getLong取得图像ID,不过两者都需要配合getColumnIndex使用。// 获取SD卡中的图像
public View getView(int position,View convertView, ViewGroup parent){
if(convertView == null){
convertView = new ImageView(PhotoGallery.this);
((ImageView)convertView).setImageBitmap(getImageBitmap(position, SMALL_IMAGE));
// 设置小图像的大小
convertView.setLayoutParams(new Gallery.LayoutParams(200,200));
// 使图像的大小跟控件相符
((ImageView)convertView).setScaleType(ImageView.ScaleType.FIT_XY);
convertView.setBackgroundResource(mGalleryItemBackground);
}
return convertView;
}
getView方法是整个代码中最重要的部分。第一个参数position是表示返回第几项,第二个参数convertView是我们要返回的图像。方法有两种,一种是从XML文件中inflate,还有一种用new生成。本次使用后者。private Bitmap getImageBitmap(int position,int size){
Uri imageUri = Uri.withAppendedPath(
MediaStore.Images.Media.EXTERNAL_CONTENT_URI, ""+getItemId(position));
BitmapFactory.Options options = new BitmapFactory.Options();
if(size == SMALL_IMAGE){
options.inSampleSize = 10;
}else{
options.inSampleSize = 4;
}
Bitmap resizedBitmap = null;
try{
InputStream is = mResolver.openInputStream(imageUri);
resizedBitmap = BitmapFactory.decodeStream(is,null,options);
is.close();
}catch(IOException e){
return null;
}
return resizedBitmap;
}
最后getImageBitmap取得图片。