
package com.bn.Sample11_1;
import static com.bn.Sample11_1.Sample11_1Activity.*;
import java.io.IOException;
import java.io.InputStream;
import java.util.Collections;
import javax.microedition.khronos.egl.EGLConfig;
import javax.microedition.khronos.opengles.GL10;
import android.content.Context;
import android.graphics.Bitmap;
import android.graphics.BitmapFactory;
import android.opengl.GLES20;
import android.opengl.GLSurfaceView;
import android.opengl.GLUtils;
import android.view.MotionEvent;
public class MySurfaceView extends GLSurfaceView {
static final float UNIT_SIZE = 1f;
static float direction = 0;// 视线方向
static float cx = 0;// 摄像机x坐标
static float cz = 15;// 摄像机z坐标
static final float DEGREE_SPAN = (float) (3.0 / 180.0f * Math.PI);// 摄像机每次转动的角度
// 线程循环的标志位
boolean flag = true;
float x;
float y;
float Offset = 15;
SceneRenderer mRender;
float preX;
float preY;
public MySurfaceView(Context context) {
super(context);
this.setEGLContextClientVersion(2); // 设置使用OPENGL ES2.0
mRender = new SceneRenderer(); // 创建场景渲染器
setRenderer(mRender); // 设置渲染器
setRenderMode(GLSurfaceView.RENDERMODE_CONTINUOUSLY);// 设置渲染模式为主动渲染
}
@Override
public boolean onTouchEvent(MotionEvent event) {
x = event.getX();
y = event.getY();
switch (event.getAction()) {
case MotionEvent.ACTION_DOWN:
flag = true;
new Thread() {
@Override
public void run() {
while (flag) {
if (x > 0 && x < WIDTH / 2 && y > 0 && y < HEIGHT / 2) {// 向前
Offset = Offset - 0.5f;
} else if (x > WIDTH / 2 && x < WIDTH && y > 0
&& y < HEIGHT / 2) {// 向后
Offset = Offset + 0.5f;
} else if (x > 0 && x < WIDTH / 2 && y > HEIGHT / 2
&& y < HEIGHT) {
direction = direction + DEGREE_SPAN;
} else if (x > WIDTH / 2 && x < WIDTH && y > HEIGHT / 2
&& y < HEIGHT) {
direction = direction - DEGREE_SPAN;
}
try {
Thread.sleep(100);
} catch (Exception e) {
e.printStackTrace();
}
}
}
}.start();
break;
case MotionEvent.ACTION_UP:
flag = false;
break;
}
// 设置新的观察目标点XZ坐标
cx = (float) (Math.sin(direction) * Offset);// 观察目标点x坐标
cz = (float) (Math.cos(direction) * Offset);// 观察目标点z坐标
// 计算所有树的朝向
mRender.tg.calculateBillboardDirection();
// 给树按照离视点的距离排序
Collections.sort(mRender.tg.alist);
// 设置新的摄像机位置
MatrixState.setCamera(cx, 0, cz, 0, 0, 0, 0, 1, 0);
return true;
}
private class SceneRenderer implements GLSurfaceView.Renderer {
TreeGroup tg;
Desert desert;
int treeId;
int desertId;
public void onDrawFrame(GL10 gl) {
// 清除深度缓冲与颜色缓冲
GLES20.glClear(GLES20.GL_DEPTH_BUFFER_BIT
| GLES20.GL_COLOR_BUFFER_BIT);
MatrixState.pushMatrix();
MatrixState.translate(0, -2, 0);
desert.drawSelf(desertId);
MatrixState.popMatrix();
// 开启混合
GLES20.glEnable(GLES20.GL_BLEND);
// 设置混合因子
GLES20.glBlendFunc(GLES20.GL_SRC_ALPHA,
GLES20.GL_ONE_MINUS_SRC_ALPHA);
MatrixState.pushMatrix();
MatrixState.translate(0, -2, 0);
tg.drawSelf(treeId);
MatrixState.popMatrix();
// 关闭混合
GLES20.glDisable(GLES20.GL_BLEND);
}
public void onSurfaceChanged(GL10 gl, int width, int height) {
// 设置视窗大小及位置
GLES20.glViewport(0, 0, width, height);
// 计算GLSurfaceView的宽高比
float ratio = (float) width / height;
// 调用此方法计算产生透视投影矩阵
MatrixState.setProjectFrustum(-ratio, ratio, -1, 1, 1, 100);
// 调用此方法产生摄像机9参数位置矩阵
MatrixState.setCamera(cx, 0, cz, 0, 0, 0, 0f, 1.0f, 0.0f);
}
public void onSurfaceCreated(GL10 gl, EGLConfig config) {
// 设置屏幕背景色RGBA
GLES20.glClearColor(1.0f, 1.0f, 1.0f, 1.0f);
// 打开深度检测
GLES20.glEnable(GLES20.GL_DEPTH_TEST);
MatrixState.setInitStack();
tg = new TreeGroup(MySurfaceView.this);
// 初始化树顺序
Collections.sort(mRender.tg.alist);
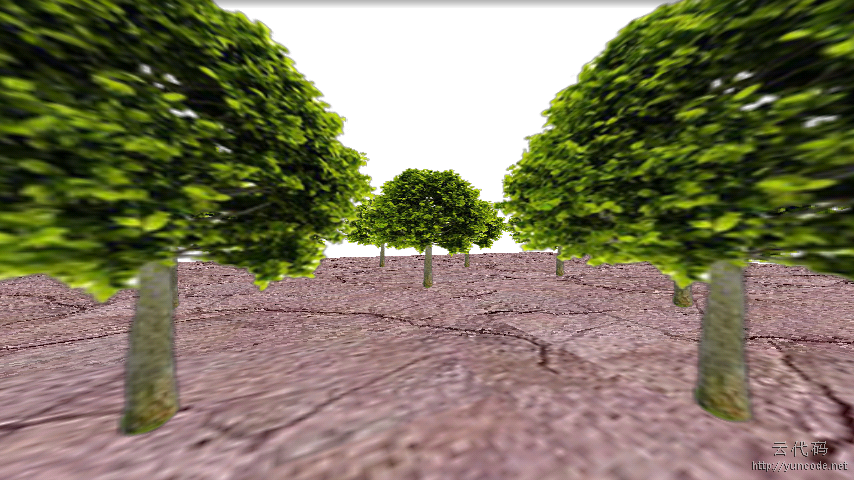
desert = new Desert(MySurfaceView.this, new float[] { 0, 0, 0, 6,
6, 6, 6, 6, 6, 0, 0, 0 }, 30, 20);
// 初始化纹理
treeId = initTexture(R.drawable.tree);
desertId = initTexture(R.drawable.desert);
}
}
// 生成纹理的id
public int initTexture(int drawableId) {
// 生成纹理ID
int[] textures = new int[1];
GLES20.glGenTextures(1, // 产生的纹理id的数量
textures, // 纹理id的数组
0 // 偏移量
);
int textureId = textures[0];
GLES20.glBindTexture(GLES20.GL_TEXTURE_2D, textureId);
GLES20.glTexParameterf(GLES20.GL_TEXTURE_2D,
GLES20.GL_TEXTURE_MIN_FILTER, GLES20.GL_NEAREST);
GLES20.glTexParameterf(GLES20.GL_TEXTURE_2D,
GLES20.GL_TEXTURE_MAG_FILTER, GLES20.GL_LINEAR);
GLES20.glTexParameterf(GLES20.GL_TEXTURE_2D, GLES20.GL_TEXTURE_WRAP_S,
GLES20.GL_REPEAT);
GLES20.glTexParameterf(GLES20.GL_TEXTURE_2D, GLES20.GL_TEXTURE_WRAP_T,
GLES20.GL_REPEAT);
// 通过输入流加载图片
InputStream is = this.getResources().openRawResource(drawableId);
Bitmap bitmapTmp;
try {
bitmapTmp = BitmapFactory.decodeStream(is);
} finally {
try {
is.close();
} catch (IOException e) {
e.printStackTrace();
}
}
// 实际加载纹理
GLUtils.texImage2D(GLES20.GL_TEXTURE_2D, // 纹理类型,在OpenGL
// ES中必须为GL10.GL_TEXTURE_2D
0, // 纹理的层次,0表示基本图像层,可以理解为直接贴图
bitmapTmp, // 纹理图像
0 // 纹理边框尺寸
);
bitmapTmp.recycle(); // 纹理加载成功后释放图片
return textureId;
}
}

中级程序员


初级程序员
by: 小蘑菇 发表于:2013-05-05 22:49:09 顶(1) | 踩(0) 回复
太高级,收藏备用啊
回复评论